Main Interface & Languages
The first 'Main Interface & Languages' tab allows for translating various languages for the IndySoft user interface.
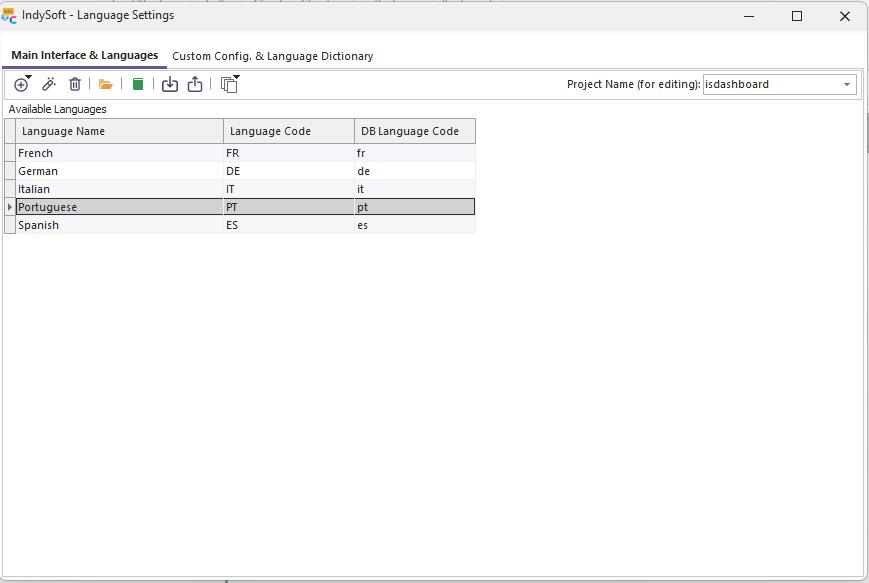
Main Interface & Languages Tab
First, note there are 60 different projects available for translation in the 'Project Name (for editing)' drop-down. Of the nearly 70 IndySoft executables, 60 are appropriate/available for translation. (The remaining exes are irrelevant for various reasons: Services without a user interface or tools directly related to the language translation, like LanguageSettings.exe, etc.). For each of these selected projects, a listing of available languages is shown in the grid beneath. So it is possible to target just one (or a few) projects and add language translations only for these projects + language combinations. Or, if you prefer to work in batch, there are 'Batch Operations' available above the grid that allow languages to be added/deleted/auto-translated across all 60 projects simultaneously.
![]() Version 13.0.16 || Language Manager utility now displays directory location for language files beneath the languages grid - to assist in language debugging
Version 13.0.16 || Language Manager utility now displays directory location for language files beneath the languages grid - to assist in language debugging

Language Directory Location
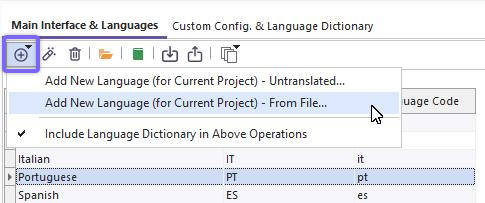
Add New Language Menu - Options
Add New Language (for Current Project) - Untranslated: Use this option to create a new language for the selected project. This new language will be untranslated. Use the Language Manager or Auto-Translate options to complete the translation. You will be prompted to select the new language name. The Available Languages grid will be automatically refreshed, and the new language will be selected.
Add New Language (for Current Project) - From File: Use this option to create a new language for the selected project by importing a *.lng file. A file selection dialog will follow. The name of the language will be automatically determined from the file selected. Use this option if the file already exists on another workstation working on the same translation. The Available Languages grid will be automatically refreshed, and the new language will be selected.
Include Language Dictionary in Above Operations: This option automatically adds the new language input during the above two operations into the Language Dictionary (stored in the IndySoft database, not as a file). Keeping the # of languages consistent between these two main tabs is typically best. So this option will automatically perform the 'Add Language to Language Dictionary' button functionality on the 'Custom Config. & Language Dictionary' tab for the same new language whenever one of the two above operations is executed. The new language will only be added to the database if not previously created.
Edit Translations (Launch Language Manager): Use this option to launch the Language Manager utility and perform translations. Note: Remember that the language(s) first visible in the Language Manager will NOT necessarily correspond to the language currently selected in the 'Available Languages' grid.
Delete Selected Language: Use this option to delete the selected language for the current project. Keep in mind that any translation work will be lost upon deletion. The *.lng file for the current project and language will be removed from the IndySoft Languages folder, and the 'Available Languages' grid will be refreshed.
Open IndySoft Languages Folder: All main interface translations are stored as [ProjectName].[LangCode].lng files in a common directory on the workstation. This directory must be editable to end-users, so the IndySoft program directory is not used. This 'IndySoft Languages Folder' also contains *.ntv.lng files, which store translation item details as needed by Language Manager. *.leo files within this directory correspond to settings within Language Manager. Use this option to go to the IndySoft Languages folder in Windows Explorer. It is not necessary to perform any actions on these files. This option is only convenient and allows for easy access to IndySoft Support.
Auto-Translate Selected Language: Use this option to translate items for the selected project using Google Translate automatically. A Google API key will be required before this operation can be executed. To sign up for a key with Google, use this link: https://cloud.google.com/translate/. The 'Source' language for the translation will always be English (since that is the native language for IndySoft), and the 'Destination Language' will be the selected language in the 'Available Languages' grid. The Auto-Translate process will automatically remove any '&' characters corresponding to keyboard shortcuts and retain any '%s' formatting tokens within the translated text. For this reason, all auto-translate operations should be executed using this function (or the matching Batch functions) rather than from within the Language Manager. Before translation begins, you will be prompted for translation options:
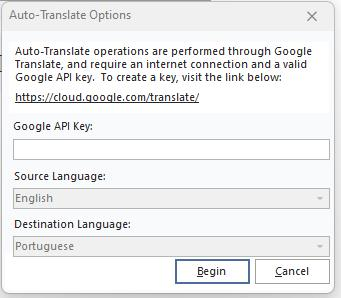
Auto-Translate Options - Google API Input
Note: The above Google API dialog will not be shown if you only perform an auto-translate operation into 'Pig Latin.' The 'Pig Latin' fake language is only included for testing purposes. Performing a quick translation to Pig Latin can give you an easy review of functionality while keeping the onscreen text somewhat readable. And you don't have to waste a full Google API machine translation to begin playing with the concepts! If you are unfamiliar with Pig Latin (really?) - it is simply the first consonant of each word moved to the end, followed by 'ay.' If the word begins with a vowel, then the vowel is retained, and 'yay' is added to the end of the word.

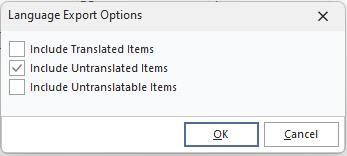
Language Export Options
It is most common to accept the defaults on this dialog ('Include Untranslated Items' only and 'Attempt to Translate with Local Repository First'). If you would also like to force a translation of already-translated items, check the first box. If you would also like to force a translation of items marked as 'untranslatable,' check the third option. The Local Repository is an option in the Language Manager for remembering translations across projects in a common local dictionary. This local dictionary can speed up the translation process and keep translations more consistent.
Generally, your translator(s) will work almost exclusively in the Language Manager to input translations. Use the XML export/import operations below to merge work between workstations, if necessary.
Import Selected Language From XML File: Use this option to import translations from an XML file provided by another user (typically a translator). This XML file would likely have been created by the 'Export Selected Language to XML File' option below - by a translator on another workstation. Before import, you will be asked this important question:

Confirm before XML import - Language File.
Export Selected Language to XML File: Use this option to export items for translation to an XML file. This XML file could be imported using the above 'import' operation on another workstation. The file name will default to the name of the project + language code + .xml. First, select the items appropriate for inclusion in the XML file:
Language Export Options - XML File
Batch Operations (All Projects): There are approximately 60 projects that are available for translation in IndySoft, so keeping all the languages and translations consistent can be a challenge. Sometimes it is preferable to perform the same operations as above in batch - meaning they will operate upon all projects together rather than simply the selected project. Remember that these operations (especially the auto-translate) can take some time to complete.
Add a New Language - Untranslated - for ALL Projects: This option works just as the 'Add New Language (for Current Project) - Untranslated' option described above, but across all projects. A progress bar will be displayed to note progress through the various projects.
Delete a Language for ALL Projects: This option works as the 'Delete Selected Language' option described above but across all projects. A progress bar will be displayed to note progress through the various projects.
Auto-Translate a Language for ALL Projects: This option works as the 'Auto-Translate Selected Language' option above but across all projects. A progress bar will be displayed to note progress through the various projects. Within each project, a second progress bar will note the translation process for the current project. Note: This operation can be lengthy, depending on the # of untranslated items across all projects and your Internet connection speed. Remember that your Google API key has a credit card account associated - so any translations beyond the introductory period will be billed.
Include Language Dictionary In Above Operations: This option automatically adds the new language input during the above two operations into the Language Dictionary (stored in the IndySoft database, not as a file). Keeping the # of languages consistent between these two main tabs is typically best. So this option will automatically perform the 'Add Language to Language Dictionary' button functionality or the 'Delete Selected Language from Language Dictionary' button functionality (as appropriate) on the 'Custom Config & Language Dictionary' tab for the selected language whenever one of the two above operations is executed.
Zip All Translation Files for a Language - ALL Projects: At the end of the translation project, assuming all IndySoft projects were completed for a language, there would be 60 or so *.[LangCode].lng files in the IndySoft Languages Folder on the translation workstation. These exact files must be distributed to any other workstation that would like to run IndySoft with these exact translations. Use this option to quickly ZIP all the *.lng files for one language across all projects. These ZIP files can then be imported on another workstation using the option below or from the 'Import' button on the 'Change Language' utility in the IndySoft login dialog.
Import Translation Files From a ZIP File: Use this option to quickly import all the *.lng files for a language, as exported from another workstation, using the above export option. This same operation can be performed from the 'Import' button on the 'Change Language' utility on the IndySoft login dialog. |