Out Inventory
Out Inventory Templates are used to locate groups of hand tools quickly checked out through the event system (only applies to Tool IndySoft and IndySoft Studio product types). When equipment is set up on the IndySoft main screen with an equipment group of 'Hand Tool,' multiple quantities/inventory can be tracked for this ID. The event system can be used to check 'out' inventory quantities to different employees, locations, departments, etc. If the equipment is set up as a 'Hand Tool,' it is expected to be eventually returned to its storage location. 'Consumables' are similar to 'Hand Tools' in that they also allow for inventory control - but 'Consumables' are not tracked for return when checked 'out.' So, once the event system has been used to check out various quantities of Hand Tools, Out Inventory Template dialogs can be set up to locate these quantities quickly.
Note that this type of search/report differs slightly from EquipmentFinder or an equipment custom search-by. The interface is similar, but the results (grid or report) list quantities of equipment that were checked out at various times. So one ID can be listed several times. For instance, in the screenshot below, five quantities of equipment are listed, shown as five records in the grid.

But not all ID's in this grid are unique: like SCREWDRIVER. The items in the grid are unique based on a combination of important fields: Company + ID + Crib Number + Bin Number + Event Date + Event Time (some of these labels might be different on your system, based on company/system preferences). So, in the above example, the first record shows that 'on 3/17/2023 at 2:19 PM a quantity of 2 items was 'Checked Out' from the 'BIN 5' Bin in 'LOCATION 1' for the 'SCREWDRIVER' ID owned by 'ABC COMPANY.'
Out Inventory Templates can quickly select assets on the main screen, launch events, or run reports. Double-click an asset in the results grid to select an asset on the main screen (when the Out Inventory Template is called from the 'Search By' menu item). To launch an event, use the popup menu above the grid accessed from the black arrow. Note: When selecting records into an event from an Out Inventory Template, the full selection of Company + ID + Crib Number + Bin Number + Quantity will be used. So in the above screenshot, if you selected the second record and then launched a 'Check In' event from above the grid, you would see the resulting 'Choose Equipment' grid in the event populated by a return of 2 items from 'ABC COMPANY' / 'SCREWDRIVER' that were originally stored at 'LOCATION 1' / 'BIN 5'.
Out Inventory templates are set up from PrintBuilder through the 'OUT INVENTORY' template type. Templates are created just as any PrintBuilder template, each keyed by a unique name. Once created/configured, Out Inventory Templates can quickly locate equipment and run reports. Note that each template has a unique name on the right side above the results grid. When the 'Save Settings' button is pressed (bottom left) or the dialog is closed by pressing the 'Save & Close' button, ALL settings are saved for the selected template. These saved settings include:
·Configuration of 'Out Inventory Filter'
·Configuration of 'Equipment Filter'
·Locked/Unlocked state of 'Out Inventory Filter'
·Locked/Unlocked state of 'Equipment Filter'
·Configuration of results grid, including # of visible fields, field widths, and field positions
·Toggle for 'Auto-Select Results Upon Launch'
·Toggle for 'Auto-Create Report Upon Launch'
·Toggle for 'Create Report' panel visibility
·Selection of default 'Print Type.'
·Selection of default 'Destination.'
·Any Report Layout customizations
·Size and initial position of dialog
·PDF Options, if appropriate
So once these settings are saved back to the Out Inventory Template, these settings will dictate the behavior of the dialog whether it is called from a 'Search By' menu item on the main screen (see Setup Custom Search By's / Reports / Layouts for more details), or whether accessed from the alarm system (see Alarm System - Adding/Editing Alarms...Out Inventory Options for more details).
The Out Inventory configuration dialog, as accessed from PrintBuilder, has five main sections:
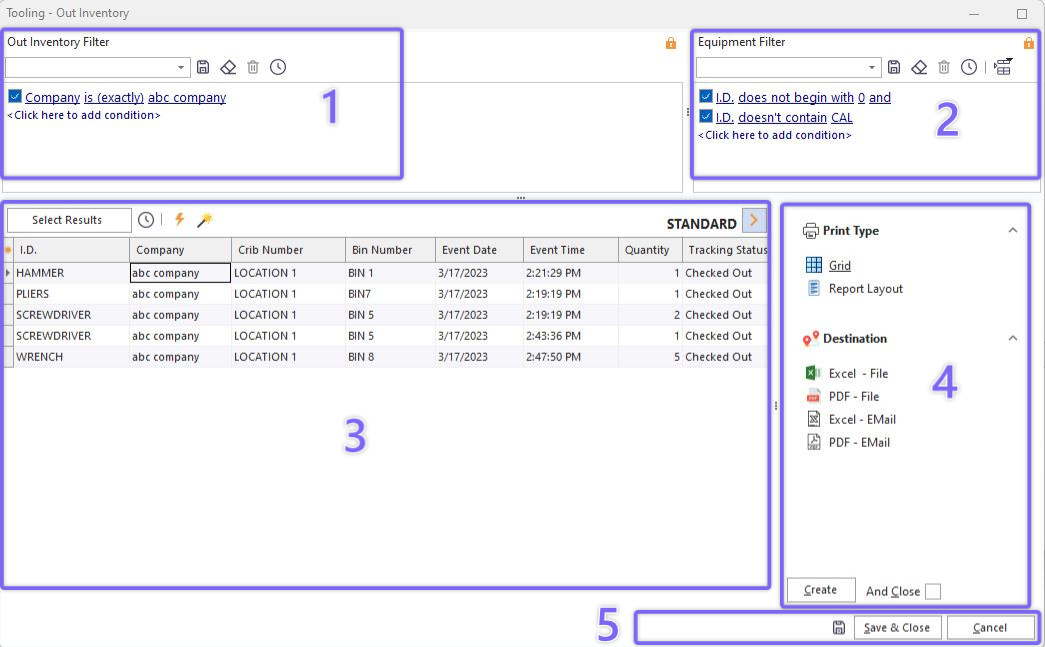
- Out Inventory Filter

Use this section to enter any search criteria for the 'Out Inventory' record. Whenever a Hand Tool is checked out in IndySoft, a record of this quantity is tracked in the database to be recalled for check-in quickly. Each quantity of equipment is stored along with its Company, ID, Tracking Status, Quantity, Event Date, Event Time, and all Current* and Transit* fields, as appropriate to the tracking status selected when the equipment was checked out. This filter box allows you to filter on these various 'piles' assets. For instance, you might want to search for all quantities checked out from a particular company this month to a particular location. Once the filter is configured, you can use the lock button in the upper right to set the filter box to read-only when the Out Inventory Template is recalled from the main screen.
- Equipment Filter
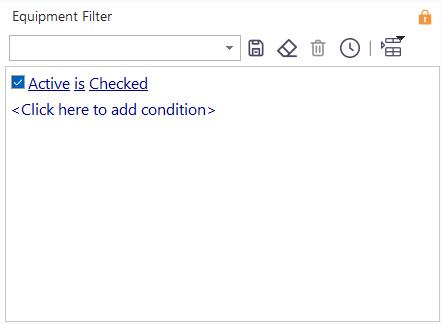
The Equipment Filter is typically used to supplement your 'Out Inventory' filter with additional search criteria based upon the matching equipment record. For instance, besides using the 'Out Inventory Filter' to find all quantities checked out from a particular company this month to a particular location, you might want to filter the result set only to show equipment from a particular manufacturer and model number. Once the filter is configured, you can use the lock button in the upper right to set the filter box to read-only when the Out Inventory Template is recalled from the main screen. Note: The equipment filter can be left blank if desired. Using only the equipment filter and leaving the 'Out Inventory Filter' blank is also acceptable.
Results Grid

Press the 'Select Results' button to populate the results grid with matching records based on the above search filter(s). To test the search and return only the number of matching records, use the stopwatch button to the right of 'Select Results.' Two options can be accessed by right-mouse click on the grid:
Show Group Panel: this option will show/hide the group panel for the grid. Drag any field into this group panel to create a node in the grid.
Customize Fields: this option will show a small popup screen showing all fields currently hidden for the grid. Drag/drop fields to or from this dialog to customize the fields in the grid. Note: You can also quickly select/hide fields by pressing the small square in the upper-left of the grid:

Three toggle buttons are provided above the grid, which determines the behavior of the Out Inventory Template when it is recalled from the IndySoft main screen:
![]() Press this toggle to instruct the Out Inventory template to automatically populate the results grid when the dialog is called from the IndySoft main screen. This saves the end-user from pressing the 'Select Results' button each time the dialog is recalled.
Press this toggle to instruct the Out Inventory template to automatically populate the results grid when the dialog is called from the IndySoft main screen. This saves the end-user from pressing the 'Select Results' button each time the dialog is recalled.
![]() Press this toggle to instruct the Out Inventory template to automatically create the report, as configured in the Print Options (see below). This saves the end-user from pressing the 'Create' button each time the dialog is recalled.
Press this toggle to instruct the Out Inventory template to automatically create the report, as configured in the Print Options (see below). This saves the end-user from pressing the 'Create' button each time the dialog is recalled.
![]() Press this toggle to control the visibility of the 'Print Options' section to the right.
Press this toggle to control the visibility of the 'Print Options' section to the right.
- Print Options
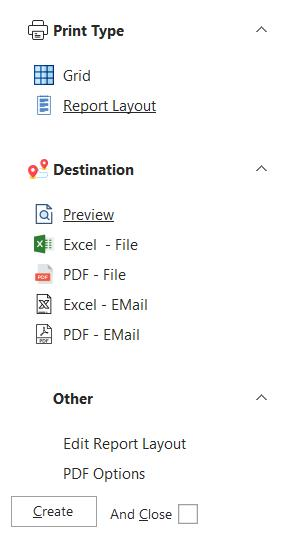
Out Inventory Templates can be used as a search by's for quickly locating equipment. In addition, the result set can be output to various report styles through the 'Print Options section. Configuration options include:
Print Type
·Grid: this print style will output the results grid exactly as it is customized in the Out Inventory Layout. This includes the field positions, field widths, etc.
·Report Layout: this print style will out the records in a custom report layout. When this print type is selected, you will notice the 'Edit Report Layout' item becomes visible in the 'Other' section. Press this link to configure the look/feel of the report. The available fields will correspond to those currently visible in the results grid.
Destination
·Preview: this will output the report to a preview window. The report can be printed directly from the preview window if desired. If the Print Type is 'Grid,' the preview window will contain many additional formatting options related to page margins and grid appearance.
·Printer: this will output the report to a Windows-installed printer. Before printing, a printer-selection dialog will be shown, also allowing options for printing multiple copies, etc.
·Excel - File: this will output the report as an Excel file to a local/network drive, saved to an XLS file name selected from a 'Save File' dialog shown at the report creation time.
·PDF - File: this will output the report as a PDF file to a local/network drive, saved to a PDF file name selected from a 'Save File' dialog shown at the report creation time.
·Excel - EMail: this will output the report to an Excel file and then automatically attach this file to an email that is previewed on the screen. First, the user is prompted for a listing of IndySoft email addresses that should receive the email. Common options are Company, Vendor, Employee, and Other emails.
·PDF - EMail: this will output the report to a PDF file and then automatically attach this file to an email that is previewed onto the screen. First, the user is prompted for a listing of IndySoft email addresses that should receive the email. Common options are Company, Vendor, Employee, and Other emails.
Other
·Edit Report Layout: this option is only available if the 'Print Type' is 'Report Layout.' This option will show the IndySoft Report Designer, like the interface used when designing other PrintBuilder event reports like Certs, Receipts, Packing Slips, etc. It is also similar to 'design' layout standard reports. Note that the available fields for the report (View...Toolbars...Data Tree) is limited to the fields currently visible in the grid. See the IndySoft Custom Report Designer topic for more details.
·PDF Options: this option will only be available if the 'Destination' is 'PDF - File' or 'PDF - EMail.' This dialog allows for selecting advanced pdf options like Compression, Author, Creator, Keywords, Subject, Title, Font Encoding, JPEG Quality, and DPI. These options can help reduce the size of the resulting file or improve the output quality.
![]() Press the 'Create' button when ready to create the report.
Press the 'Create' button when ready to create the report.
![]() Selecting this option will affect the functionality of the Out Inventory Template if/when it is recalled from the IndySoft main screen. When this is selected, the Out Inventory Dialog is automatically closed after creating the report. Otherwise, the dialog remains onscreen for additional filter or report customization.
Selecting this option will affect the functionality of the Out Inventory Template if/when it is recalled from the IndySoft main screen. When this is selected, the Out Inventory Dialog is automatically closed after creating the report. Otherwise, the dialog remains onscreen for additional filter or report customization.
- Save / Close
![]()
Press the 'floppy disk' save button on the left to save our settings while you are in the Out Inventory Template setup dialog. This will save your settings without having to exit the dialog. Press 'Save & Close' to save and exit the dialog, or press 'Cancel' without saving your changes. |