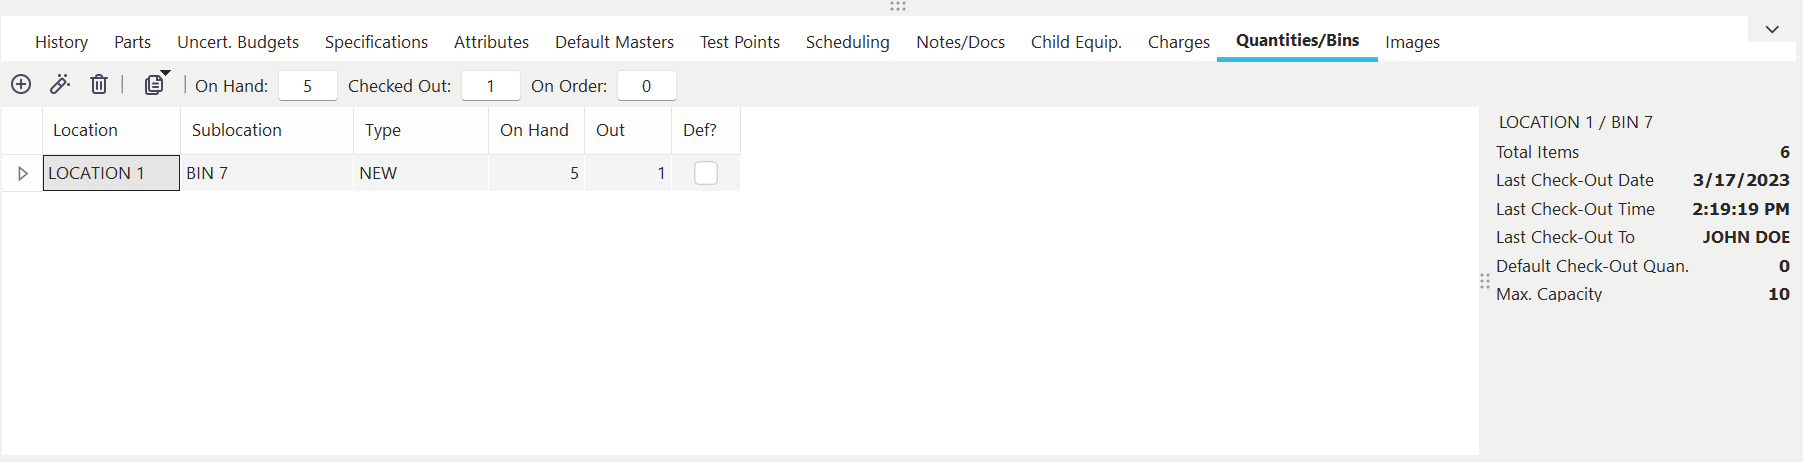
Quantities / Bins
The Quantities/Bins tab only applies to assets that belong to 'HAND TOOL' or 'CONSUMABLE' type Equipment Groups. Note that Equipment Groups can have customizable names, but each name must always point to a 'type' of equipment group. There are four possibilities: 'GAGE,' 'UNIQUE TOOL,' 'HAND TOOL,' and 'CONSUMABLE.' See the System Wide Preferences - Equipment Groups topic for more details on the differences. 'HAND TOOL' and 'CONSUMABLE' assets include support for inventory control and storage in multiple locations. The storage locations and quantities are assigned on the 'Quantities/Bins' tab.
Quantities / Bins Tab/Dialog
This tab has a single grid listing all Crib/Bin storage locations assigned to this asset. When a crib/bin is selected in the grid, several data points are updated in a right-hand panel (Total Items, Last Check-Out Date, Last Check-Out Time, etc.). If the current asset is a 'HAND TOOL' type, you will see quantities listed in the grid for both 'On Hand' and 'Out.' Also, above the grid, you will see a total (across all cribs/bins) of 'On Hand,' 'Out,' and 'On Order.' If the current asset is a 'CONSUMABLE,' the 'Out' quantities are omitted both in and above the grid.
To add a new storage location (crib/bin), press the ![]() 'Add a Crib/Bin Location' button above the grid. The following dialog will appear:
'Add a Crib/Bin Location' button above the grid. The following dialog will appear:
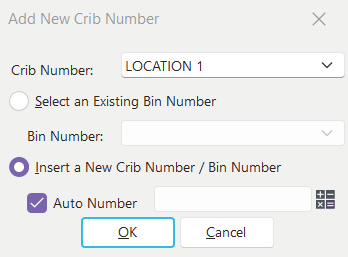
Add New Bin
This dialog prompts first for the crib number of the new bin where the tool will be stored. If a 'Crib Number' is set up in User/Location Settings, this 'Crib Number' will be defaulted in the drop-down. Next, select a pre-existing bin from the 2nd drop-down, or select the 'Insert a New Crib / Bin' radio box. The 'Autonumber' check box is optional - this will auto-generate the 'Bin Number' if you have selected 'Insert a New Crib / Bin.' Note that autonumbering must be activated for the selected crib for this option to work. Enter your Bin details in the next dialog. After pressing 'OK,' you will be prompted for the initial quantity that should be listed for this crib/bin:
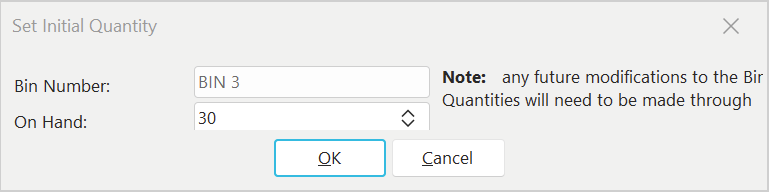
Set Initial Quantity
Press OK, then you will see your new storage location listed in the grid. To edit the crib/bin details, press the ![]() 'View a Crib/Bin Location' button above the grid. To delete a crib/bin location, press the
'View a Crib/Bin Location' button above the grid. To delete a crib/bin location, press the ![]() 'Remove Selected Crib/Bin Location' button above the grid.
'Remove Selected Crib/Bin Location' button above the grid.
Adjusting Inventory Quantities / Moving Inventory
Two additional options are listed above the grid, available from the ![]() button:
button:
·Move Inventory: this dialog will move inventory between storage locations specified in the crib/bin grid. Note that a historical event will be auto-created and available on the 'History' tab for future viewing.
·Adjust Inventory Quantities: this dialog will manually adjust the inventory total(s) for a storage location in the crib/bin grid. Note that a historical event will be auto-created and available on the 'History' tab for future viewing. |