Navigator
Equipment Navigator Dialog
Using Equipment Navigator
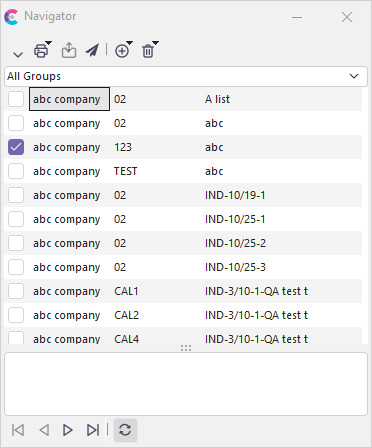
The Equipment Navigator is a convenient tool for creating a list of Equipment that can be easily navigated through and/or used as a checklist. The Equipment Navigator can hold several lists or 'groups' of Equipment. The drop-down on the top of the Equipment Navigator contains a list of all the available groups and an option for seeing all Equipment from all groups simultaneously - 'All groups.' Below this drop-down box, the Equipment Navigator displays the Equipment that belongs to the current group. If the option 'Use Navigator As Checklist' (Alt+C) is turned on, a checkbox will appear next to each Equipment. You can quickly go to an Equipment listed in the Equipment Navigator by double-clicking on the Equipment with the mouse or using the arrow keys on the keyboard to find the Equipment and then pressing the 'Enter' key. A submenu will appear with a list of additional options if a right mouse click is performed from anywhere in the list of Equipment. For more details on using these Equipment Navigator options, see Equipment Navigator Right Mouse Click Options below.
Note: Navigator Lists can contain Equipment from various Companies/Libraries. You can find an Equipment's company quickly by placing the mouse over the Serial Number in the list of Equipment. The Equipment's company will appear in a yellow 'fly-over help' box.
Navigator lists are stored in the database either specific to your user name (so they are not visible to other IndySoft users) or 'Global.' Global Navigator lists are visible to all users.
![]() Version 13.0.15 || Equipment Navigator now displays the company related to the piece of equipment directly in the grid
Version 13.0.15 || Equipment Navigator now displays the company related to the piece of equipment directly in the grid
Multiple Navigator Lists
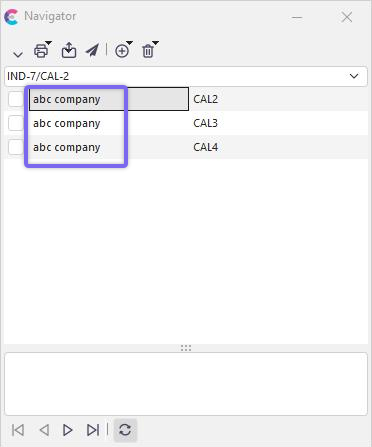
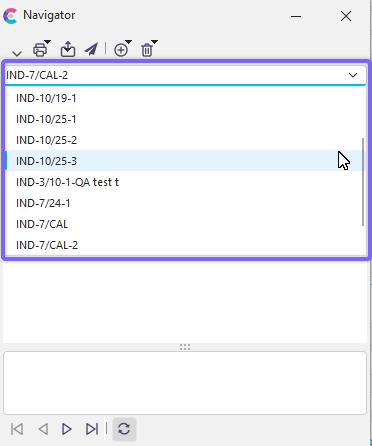
Note that it is possible to have more than one Navigator list. Each list has a unique name - when there is more than one list open, you will see a drop-down that appears above the Navigator equipment listing:
Multiple Navigator Lists
Use this drop-down to quickly switch between the lists.
Button Bar
Once you have selected equipment, you can perform several other functions using the buttons at the top of the dialog:
![]()
![]() Launch New Event
Launch New Event
If you want to launch an event immediately based on the currently selected equipment, then you can press the 'Launch New Event Arrow' and select the new event type from a popup menu. The available event types are the same as those displayed in the 'Events' menu on the IndySoft main screen.
![]() Print Certificates
Print Certificates
Use these options to print the most recent certificates from the equipment in the list. See the 'Print Certificates' section later in this topic for more details.
![]() Export Equipment
Export Equipment
Use these options to export equipment from the list. See the 'Export Equipment' section later in this topic for more details.
![]() Send Equipment To Another User
Send Equipment To Another User
Use this option to send the list of equipment to another IndySoft user. The user will be automatically prompted to receive the equipment list within 60 seconds if they are currently using IndySoft. If they are not currently logged in, they will be prompted to receive the equipment listing upon the next login. You also have the option of sending them an email describing the list and reminding them to log in to IndySoft. The following dialog will be shown:

Send Equipment List To Dialog
![]() Add Equipment
Add Equipment
Use this sub-menu to add equipment to the Navigator list. See the 'Add Equipment' section later in this topic for more details.
![]() Remove Equipment
Remove Equipment
Use this sub-menu to remove equipment from the Navigator list. There are two options:
1) Remove Current Equip. - this removes the currently selected equipment from the list, or
2) Remove All Equip. from Group - this removes all the equipment in the group.
Print Options

Navigator - Print Options Menu
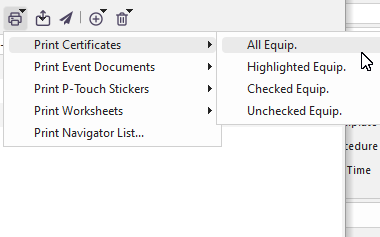
Print Certificates
Clicking this menu item produces a submenu with the option to print certificates of calibration for the most recent event with the following options:
Navigator - Print Options...Print Certificates Menu
All Equip.
Certificates will be printed for all equipment in the selected items list
Highlighted Equip.
Certificates will only be printed for the highlighted equipment in the selected items list
Checked Equip.
Certificates will only be printed for the checked equipment in the selected items list
Unchecked Equip.
Certificates will only be printed for the unchecked equipment in the selected items list
Any of the options above will bring up the following dialog.
Print Certificate Options Dialog
Event Type
This option will allow users to choose between printing a specific event type or an option for 'All Calibration Event Types.'. See the Event Configuration section for specifying which events are considered Calibration events. A good example is standard Calibration and Multi-Gage Calibration events. Both of these events are considered calibrations; however, they are still two separate event types. The 'All Calibration Event Types' feature is intended to allow for this condition.
Printer or Directory
This feature is for choosing the option of sending the certificates to a printer or a directory. The directory option would typically be used if a user wants electronic copies of the certificates. If the 'Automatically Open Files' option is chosen, the certificates will be opened after being saved to the directory. In the case of PDF certificates, they will all be combined into one PDF before being opened; however, they will be saved to the specified directory individually. This lets you quickly preview what was saved with one Acrobat Window and maintain separate certificates to send to the end user. If you want to send the combined PDF to your end user, use Adobe Acrobat to save the file (or use the Acrobat 'Send to e-mail' option).
Print Event Documents
Clicking this menu item produces a submenu with the option to print event documents for the most recent event with the following two options:
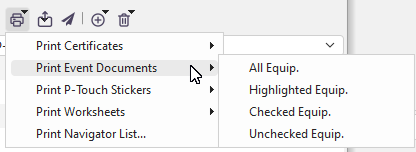
Navigator - Print Options...Print Event Docs Menu
All Equip.
Certificates will be printed for all equipment in the selected items list
Highlighted Equip.
Certificates will only be printed for the highlighted equipment in the selected items list
Checked Equip.
Certificates will only be printed for the checked equipment in the selected items list
Unchecked Equip.
Certificates will only be printed for the unchecked equipment in the selected items list
Any of the above options will bring up the following dialog.
Print Event Options Dialog
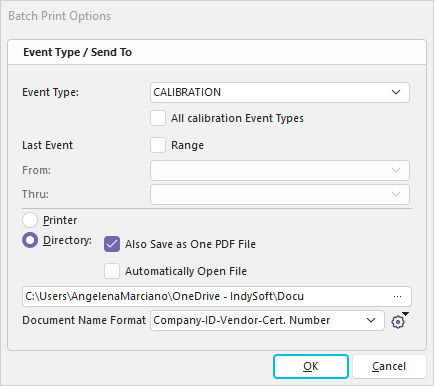
Event Type
This option will allow users to choose between printing a specific event type or an option for 'All Calibration Event Types.'. See the Event Configuration section for specifying which events are considered Calibration events. A good example is standard Calibration and Multi-Gage Calibration events. Both of these events are considered calibrations; however, they are still two separate event types. The 'All Calibration Event Types' feature is intended to allow for this condition.
Printer or Directory
This feature is for choosing the option of sending the certificates to a printer or a directory. The directory option would typically be used if a user wants electronic copies of the certificates. If the 'Automatically Open Files' option is chosen, the certificates will be opened after being saved to the directory. In the case of PDF certificates, they will all be combined into one PDF before being opened; however, they will be saved to the specified directory individually. This lets you quickly preview what was saved with one Acrobat Window and maintain separate certificates to send to the end user. If you want to send the combined PDF to your end user, use Adobe Acrobat to save the file (or use the Acrobat 'Send to e-mail' option).
Print P-Touch Stickers
Clicking this menu item produces a submenu with the option to print stickers on a P-Touch printer for the most recent event with the following two options:
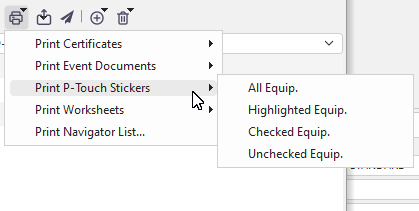
Navigator - Print Options...Print P-touch Stickers Menu
All Equip.
Stickers will be printed for all equipment in the selected items list
Highlighted Equip.
Stickers will only be printed for the highlighted item in the selected items list
Checked Equip.
Certificates will only be printed for the checked equipment in the selected items list
Unchecked Equip.
Certificates will only be printed for the unchecked equipment in the selected items list
Any of the options above will bring up the following dialog.

Choose Sticker Type Dialog
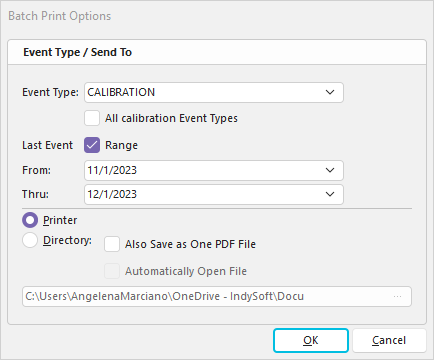
Event Type
This option will allow users to choose between printing a specific event type or an option for 'All Calibration Event Types.'. See the Event Configuration section for specifying which events are considered Calibration events. A good example is standard Calibration and Multi-Gage Calibration events. Both of these events are considered calibrations; however, they are still two separate event types. The 'All Calibration Event Types' feature is intended to allow for this condition.
Sticker Type
This feature is for choosing the type of P-Touch sticker template you wish to use when printing stickers.
Print Worksheets
Clicking this menu item produces a submenu with the option to print worksheets with the following two options:
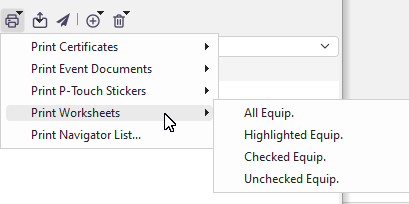
Navigator - Print Options...Print Worksheets Menu
All Equip.
Worksheets will be printed for all equipment in the selected items list
Highlighted Equip.
Worksheets will only be printed for the highlighted equipment in the selected items list
Checked Equip.
Certificates will only be printed for the checked equipment in the selected items list
Unchecked Equip.
Certificates will only be printed for the unchecked equipment in the selected items list
Either one will bring up the following dialog.
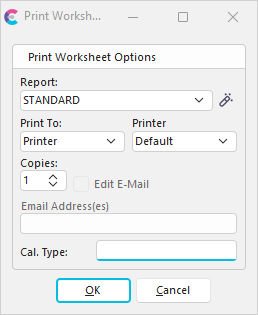
Print Worksheets Dialog
Report
This option allows you to select what report you wish to print.
![]() Press the 'Edit Template' button to edit the report.
Press the 'Edit Template' button to edit the report.
Print To
Choose from E-mail, Printer, or Screen.
Printer
Choose from Default or Printer 1-5, if Printing to Printer.
Email Address(es)
Type the email address, if printing to E-mail.
Print Navigator List
This button will launch the 'Equipment Summary - Equipment From A Navigator Group' report. See Report Types for more information.
Step 1 - Setup Report Filters
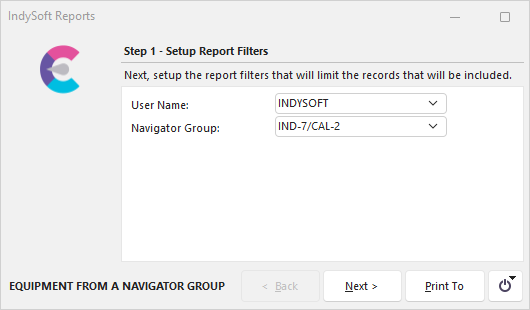
Equipment from a Navigator Group Report Dialog - Step 1
Step 2 - Setup Print Options
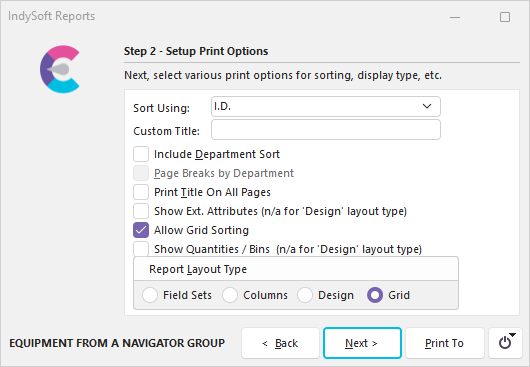
Equipment from a Navigator Group Report Dialog - Step 2
Step 3 - Edit Display Fields
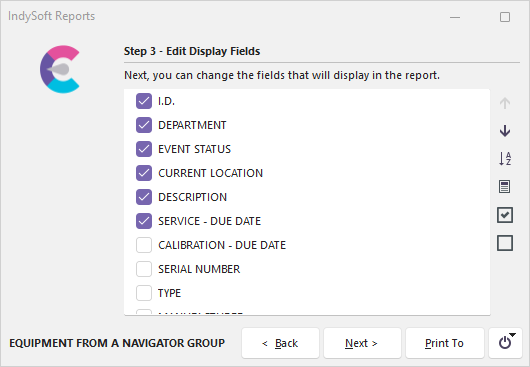
Equipment from a Navigator Group Report Dialog - Step 3
Step 4 - Print This Report To
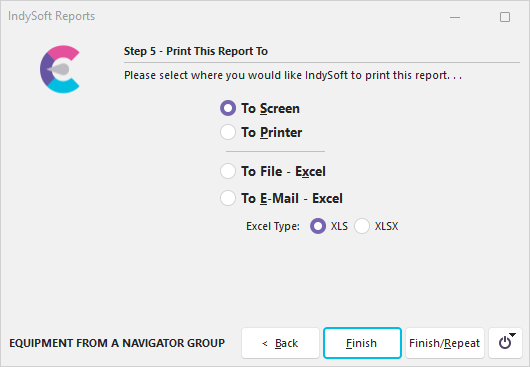
Equipment from a Navigator Group Report Dialog - Step 4
Export Equipment
There are three options available for exporting assets in a Navigator group. Note: these export options are similar to the older Legacy Export/Import Utility - this is NOT the export format used in the newer Export/Import Module.

Navigator Export Options
Export to IndySoft Lab
Equipment will be exported in a format readable by the Legacy Export/Import Utility - when imported by a lab also running IndySoft software.
Export to IndySoft Customer
Equipment will be exported in a format readable by the Legacy Export/Import Utility - when imported by a customer also running IndySoft software.
Export to EnGage! Customer
Equipment will be exported in a format readable by EnGage! - when imported by a lab also running EnGage! software.
Add Equipment
Several options are available for adding equipment to a navigator list:
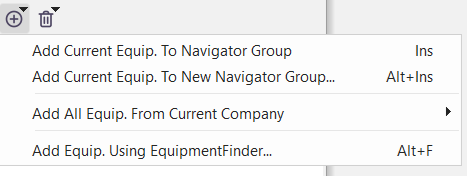
Navigator - Add Equipment Menu
Add Current Equip. To Navigator Group
Use this option to add the asset currently on the main screen to the current Navigator group.
Add Current Equip. to New Navigator Group...
Use this option to add the asset currently on the main screen to a new Navigator group. You will be prompted to add a new name for the group, and to specify if the group should be global or limited to your user name:

Specify Group Name
Add All Equip. From Current Company...To Navigator Group
Use this option to add all the assets in the current company (the company that owns the asset currently on the main screen) to the current Navigator group.
Add All Equip. From Current Company...To New Navigator Group
Use this option to add all the assets in the current company (the company that owns the asset currently on the main screen) to a new Navigator group. You will be prompted to add a new name for the group (as above) and to specify if the group should be global or limited to your user name.
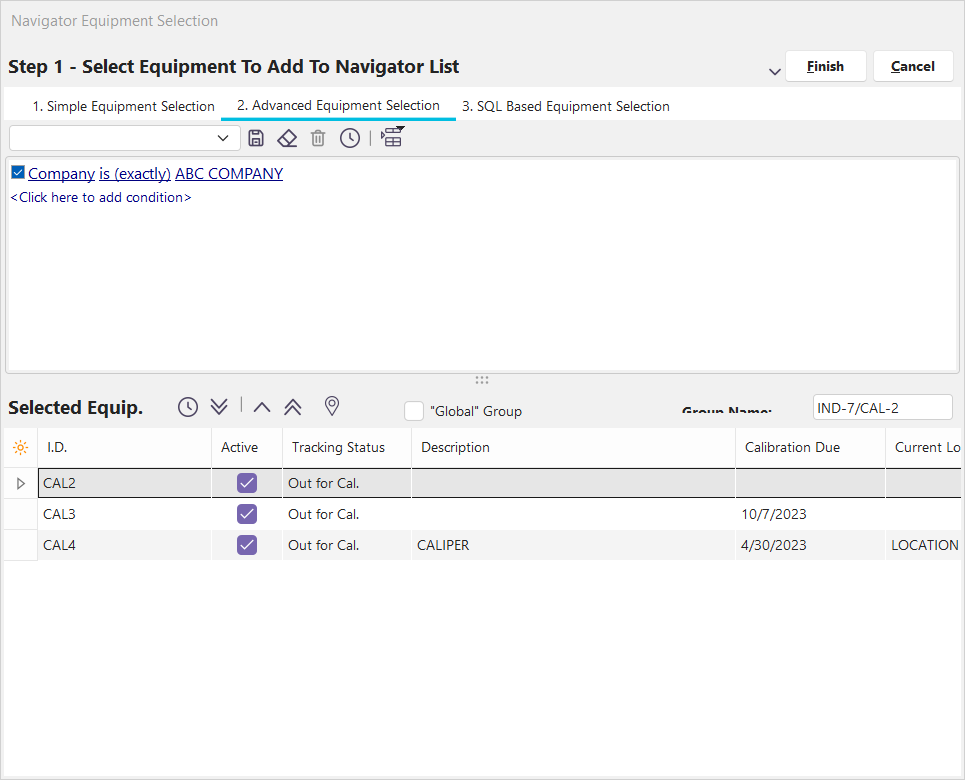
Add Equip. Using EquipmentFinder
Use this option to select assets to be included in the navigator through EquipmentFinder. Equipment added from EquipmentFinder will be added to the current Navigator list.
Bottom Panel Options - Navigation
There are five buttons on the bottom panel of the Navigator:
![]()
![]() First Equip. - goto the first asset in the list
First Equip. - goto the first asset in the list
![]() Previous Equip. - goto the previous asset in the list
Previous Equip. - goto the previous asset in the list
![]() Next Equip. - goto the next asset in the list
Next Equip. - goto the next asset in the list
![]() Last Equip. - goto the last asset in the list
Last Equip. - goto the last asset in the list
![]() Synchronize Navigator With IndySoft - when this option is toggled 'down' (ON), the asset currently selected in the Navigator list will be synced to the IndySoft main screen. When this option is toggled 'up' (OFF), you must select the asset in the Navigator list and then press the Enter key to sync.
Synchronize Navigator With IndySoft - when this option is toggled 'down' (ON), the asset currently selected in the Navigator list will be synced to the IndySoft main screen. When this option is toggled 'up' (OFF), you must select the asset in the Navigator list and then press the Enter key to sync.
Right Mouse Options
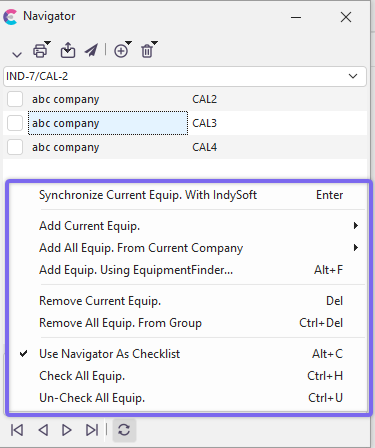
Equipment Navigator Right Mouse Options
These options are available when right-mouse clicking inside the navigator asset listing area. Most of the assets listed have already been discussed - duplicated from options in the top header panel or bottom panel. The bottom three options are new:
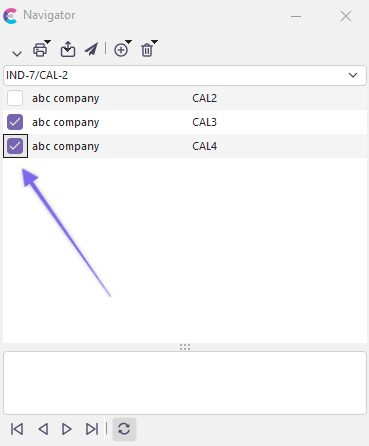
Use Navigator As Checklist
When this option is checked ON, a checkbox appears to the left of each asset in the Navigator list. You can use this checkbox for your own purposes - to remind yourself when you have addressed each asset. When this option is unchecked, the checkbox will be hidden:
 or...
or... 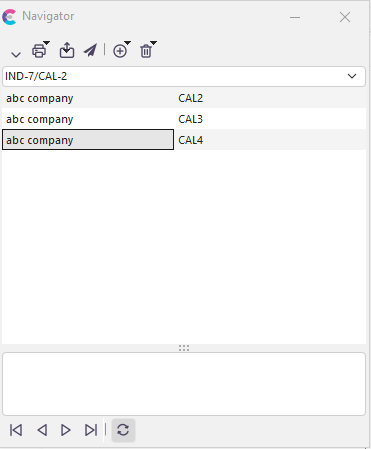
Check All Equip.
Use this option to quickly check all assets in the list. This is only relevant if you are using the 'Use Navigator As Checklist' option.
Un-Check All Equip.
Use this option to quickly uncheck all assets in the list. This is only relevant if you are using the 'Use Navigator As Checklist' option. |