Environmental Data
When you go to the Calibration Test Points screen on an incomplete event, several actions take place, followed by displaying the Environmental Data interface.
The checks that are made are as follows:
- The pipette is checked to ensure the IS_PIP node, with text value PIPETTE exists. If not, a warning will be displayed similar to the below:

If some specs are missing (possibly due to an upgrade with more nodes), this warning is displayed:

- An attempt is made to connect to each master that has IS_PIP / BALANCE node in specs. Errors connecting will be displayed. If there are no balances that can connect, you will be notified.

- A check is made for test points. If not, a warning will be displayed similar to the below:

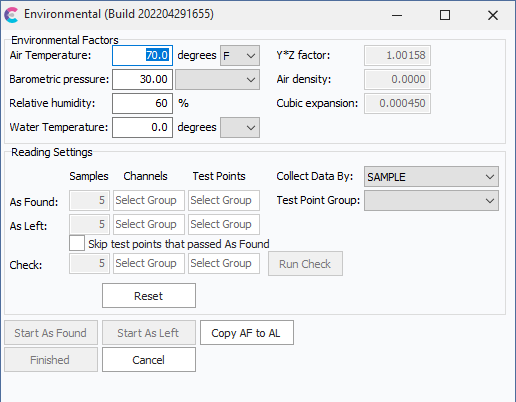
Once the Pipette is verified and the balances are connected, the screen below is displayed. This screen allows you to confirm the environmental conditions, review the YZ factor, and choose basic test options. If you do not have a multi-channel pipette and balance, it will look like this:
With a multi-channel balance, you'll also be able to indicate the arrangement of channels.
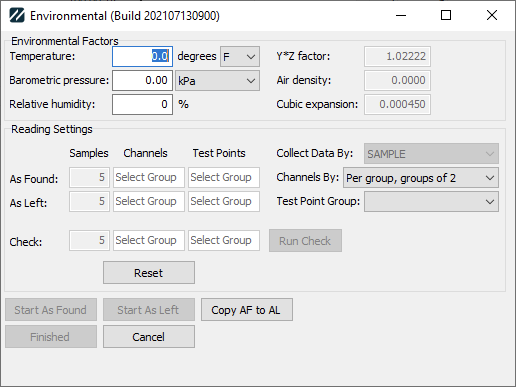
Temperature, Barometric pressure, and Relative humidity all read from the Event Information screen. In addition, Equipment IS_PIP Specs USE BAROMETRIC PRESSURE (default false), USE DENSITY (default false), USE REL HUMIDITY (default false), USE TEMPERATURE (default false), DENSITY (default 1), and CUBIC EXPANSION COEFF (default 0) are loaded.
These are used to calculate the Air Density and Z factor, used when collecting data, as follows:
temp = Temperature converted to Celsius, or set to 21.1111111 C if SE TEMPERATURE is false.
press = Barometric pressure converted to mm Hg, or set to 760 mm HG if SE BAROMETRIC PRESSURE is false.
RH = Relative humidity, or 70 if USE REL HUMIDITY is false.
Pw = 0.001*(999.83952+(16.945176*temp)-(7.9870401E-3*(temp^2))-(46.170461E-6*(temp^3))+(105.56302E-9*(temp^4))-(280.54253E-12*(temp^5)))/(1+(16.879850E-3*temp))
If IS_PIP USE DENSITY is true and a value was present for IS_PIP DENSITY, then Pw is set to IS_PIP DENSITY.
Otherwise, it uses the formula above.
es = 1.3146*109*e^(-5315.56/(temp+273.15))
Pa = ((0.4646*(press-(0.003796*RH*es)))/(273.15+temp))*1E-3
Y Factor = 1-(CUBIC EXPANSION COEFF*(temp-20))
Z Factor = (1/(Pw-Pa))*(1-Pa/8)*(Y Factor)
Changes to the Temperature, barometric pressure, and relative humidity will update the above calculations on the fly, and also update the Event Information screen.
Below those, the # Samples and which Channels/Test Points for As Found and As Left can be changed from the default, if needed. Examples of options for Channels/Test Points include "1-10", "1,3,5-10", or "1-3,4,5,6-10". This allows you to skip certain channels/test points, if desired.
In addition, you can select to Collect Data By SAMPLE (all channels for sample 1, then all channels for sample 2, etc) or by CHANNEL (all samples for channel 1, all samples for channel 2, etc). This value defaults to the one selected in Pipette Method Setup.
If you have a multi-channel balance, your options for Channels By: will depend on the spacing of the pipette. STANDARD gives you the following options:
- Per Group, groups of X
- Per Volume, groups of X
where X is either the number of channels on the balance or an equally divided number of channels on the pipette, based on the number of channels per row.
1/2 STANDARD channel spacing gives the following options:
- Per group, odds/evens of X
- Per volume, odds/evens of X
where X is either the number of odd channels per row, or an equally divided number of channels where there are more odd channels per row on the pipette than on the balance.
In both cases, Per group means you will collect all volumes for a set of channels first (reducing switching tips), while Per volume means you will collect all samples for a given volume first (switching tips more often, but fully confirming a given volume across all tips).
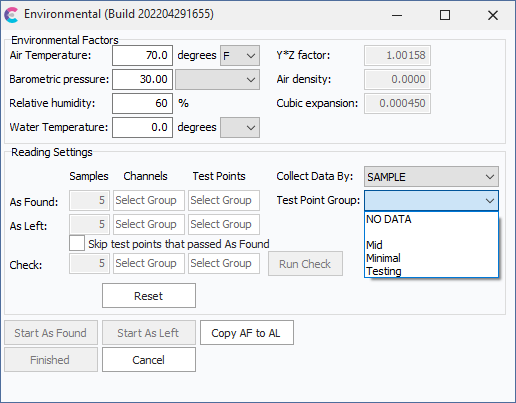
Test Point Group allows you to select which group of test points to use. The behavior will depend a little on the choices in the test point grid. If the group is blank for all test points, then data collection will be required, and the drop down will be disabled. If you are reentering the dialog after already entering some test points, the drop down will be locked to your previous choice.
Selecting NO DATA means you will not enter any readings, and instead select Pass/Fail/Adjusted outside of the Pipette Module. Any other option will update the Test Points to let you know how many are available, and default to all the test points for that group.
The "Skip test points that passed As Found" allows you to ignore any test points/channels where you collected data and the test point passed. If your as found data was only test points 1 and 6, but you select 1,3,6 for as left, then test point 3 will always be collected, but 1 and 6 would only display if they had passed.
The Copy AF to AL button will copy all As Found readings to As Left, possibly overwriting any collected As Left data.
When you click on Start As Found or Start As Left, the Environmental data will be saved to testpoints as follows (in As Found/As Left fields):
Barometric Pressure: As Found Pressure
Barometric Pressure Units: As Found Pressure Type
Relative Humidity: As Found RH
Temperature: As Found Temp.
Temperature Units: As Found Temp. Type
Y*Z Factor: As Found Num 1
Density: As Found Num 2
Expansion: As Found Num 3
Y Factor: As Found Num 4
Water Temperature + Unit: As Found Custom Text 1
You can also click Run Check, which will allow you to collect some sample data but it will not be saved, for verifying performance of the pipette.
In addition to the data, there are options to set up the RS232 connection to the scale, start taking As Found readings, and start taking As Left readings.
If a Sartorius SpeedCal Mobile with an environmental tower is connected, a button for "Read Env." will appear beneath Set up Scale for getting the current environmental conditions.