Add/Edit...Companies...Companies
Multiple Company Support is an essential concept in IndySoft. Use this wizard to add/edit companies. Most add/edit lists are specific to one company, and all assets in the database are specific to a selected company, as well as estimates, work orders, and invoices.
To add to or manage the Companies, click the Add/Edit icon in the left-hand panel, then select Companies... Companies.

Add/Edit Companies Dialog Box
![]() Click the 'New Item' icon to add a new company.
Click the 'New Item' icon to add a new company.
![]() Click the edit icon to edit the currently selected company
Click the edit icon to edit the currently selected company
![]() Click the delete icon to delete the chosen company (it must have no equipment associated)
Click the delete icon to delete the chosen company (it must have no equipment associated)
![]() To search for a company, use the 'Find Item' icon
To search for a company, use the 'Find Item' icon
![]() Use this option to print the grid
Use this option to print the grid
By clicking 'New Item' or double-clicking on the appropriate search result, the Add/Edit Company wizard dialog will display.
Information

Add/Edit Company - Information Tab
The Information tab in the Company wizard contains basic demographic information about the company or customer - most of which is self-explanatory. If using the Commercial Lab Edition, you will also have a button that says "Clear QB Mapping." This button will clear any mapping that has been previously confirmed when using the Quickbooks Export functionality. Company Logos can be input in the upper-left - these logos can be recalled from custom and event reports. The EMail address can automatically email the company in events and alarms - see Workflow Configuration - Report Rules and Alarm System - Output EMail. In the middle of the dialog, you will see 3 address-related tabs:
Billing Address | Billing addresses can be referenced from certain templates in PrintBuilder (packing slips, stickers, worksheets, alarms, work orders, estimates, invoices, non-conformance, certificates, and multi-equipment certificates). Each work order, estimate, and invoice in IndySoft has a set of billing address fields, which can be defaulted from this company wizard. The Billing Code field is similar to the Company Code field above - but can be used if the billing code differs from the basic Company Code. The Company Code field is often an alphanumeric field that links this company to a customer record in an external database.
| Shipping Address | Shipping addresses can be referenced from certain templates in PrintBuilder (packing slips, stickers, worksheets, alarms, work orders, estimates, invoices, non-conformance, certificates, and multi-equipment certificates). Each work order, estimate, and invoice in IndySoft has a set of shipping address fields, which can be defaulted from this company wizard. The Shipping Code field is similar to the Company Code field above - but can be used if the billing code differs from the basic Company Code. The Company Code field is often an alphanumeric field that links this company to a customer record in an external database.Alternate Addresses | Alternate addresses are typically used within estimates and/or work orders to set the billing or shipping fields for that estimate/order to a commonly-used address that is not the default shipping or billing address.
Note : Alternate addresses have more options/fields than billing and shipping addresses. Each location/address can contain its listing of contacts (employees). These employees will be available for selection from within the order system when creating/editing an estimate or invoice while you select alternate addresses:
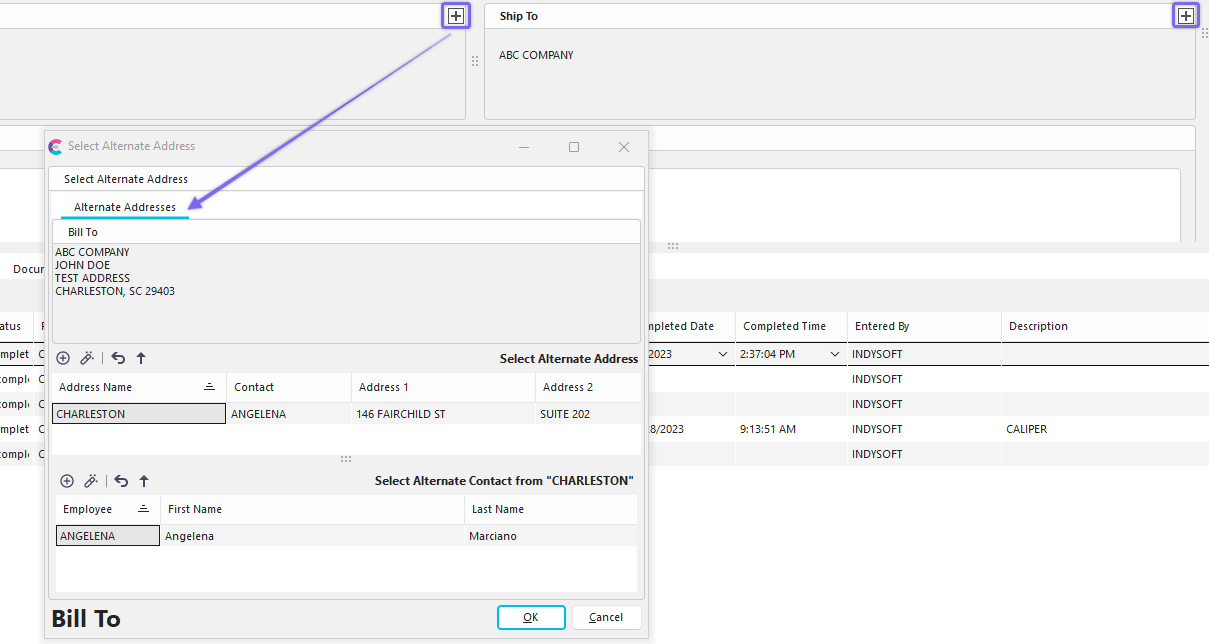
In addition, each alternate address can have its own set of Tax Tables. These Tax Tables are used upon invoicing when taxes on shipping-related charges are calculated (assuming the shipping address for the work order being invoiced was selected from an alternate address).
The Address Code field is similar to the Company Code field - but can be used if the billing code for this alternate address differs from the basic Company Code. The Company Code field is often an alphanumeric field that links this company to a customer record in an external database.
The 'Address Type' drop-down can be modified from the Add/Edit...System-Wide...Address Types wizard. |
Custom Info.
 ../Storage/indysoft-help-publication/bw_clip0207.png
Add/Edit Company - Custom Info Tab
This tab provides many additional fields that can be customized for your internal process. There are:
·20 custom text fields - each with a maximum length of 100 characters. The first 10 custom text fields are on Page 1 (subtab), and the second 10 custom text fields are on Page 2.
·6 custom numeric fields - each with a resolution of 2. The first 3 custom numeric fields are on Page 1 (subtab), and the second 3 custom numeric fields are on Page 2.
·6 custom date fields - The first 3 custom date fields are on Page 1 (subtab), and the second 3 custom date fields are on Page 2.
·20 custom status fields are available in a vertical listing on the right of the tab.
These custom fields in the 'Custom Info.' tab can have their captions customized in the System Wide Preferences dialog...User Defined Labels...Company Labels - Page 1 and Company Labels - Page 2.
Approved Vendors
More information coming soon
Additional Info
Additional Company Information grid - this open-ended grid allows for unlimited additional records. The following dialog is used:

Add/Edit Global Variables
Each variable number has a 'Variable Name.' Along with the variable name, you can enter one or more (or all) additional fields - these fields correspond to all basic field types: text, date, integer, numeric, memo, and attachment. Additional Company Information is displayed in a grid form after it has been entered for quick review. To recall a file attachment, re-edit the variable and press the 'View File' button in the dialog.
Note: The Reliability Centered Maintenance Utility also populates the Additional Company Information grid. See the RCM Setup topic for more details. It is best to use the RCM Setup utility for populating/editing these record types - but they are duplicated here for convenience.
Service Requests
Service Requests provide end users with a way to be able to log phone calls, emails from customers and future customers. Requests require that a company exists in the database, but does not require the end user to create equipment, work orders, or estimates. Requests can only be created from Add/Edit Company and accessed once created from the Add/Edit Company dialog or from the Pending Work Tab.
The Add/Edit Company interface allows the user to filter and quickly see any work orders related to a request or agreement. Users can right click on a work order to quickly view it in the order system. Requests are one time calls/transactions whereas Agreements are repeating contracts.
For more information, see the Service Requests topic.
Purchase Orders

*Add/Edit Company -*Purchase Orders Tab
Each company can store an unlimited number of purchase orders. These purchase orders populate the 'PO Number' field in the event system - see Workflow Configuration - Field Settings. Purchase orders can be input as either parent purchase orders or normal (non-parent) purchase orders. Only non-parent purchase orders are used for display/selection within the event and order system. Parent purchase orders can be validated through the custom event and order scripting - contact IndySoft for additional details. To add a new Purchase Order, select 'Add Purchase Order' or 'Add Purchase Order - Parent.' When adding/editing purchase orders, the following dialog is displayed:

Add/Edit PO Number
Note : Inserting/editing a parent PO, the 'Parent PO' drop-down will be hidden. If inserting/editing a standard PO, then the 'Parent PO' drop-down is optional - only select a Parent PO association if appropriate (this association could be enforced in a custom event or order scripting). Only 'Active' POs are displayed in the 'PO Number' field in the event system. If a PO is designated as the default, it will be automatically populated into the 'PO Number' field in the event - if the field is visible and the PO is active. Exception: if the event is linked to a work order, then the PO Number field in the event is typically linked to the work order's purchase order. All credit card information is stored for reference purposes only. All credit card fields (company, name, number, expiration, code, type, etc.) are encrypted in the database for extreme security. For profile-based security options related to credit card fields, see the 'Blocking Company Information' security category...'Block User From Adding Credit Card Info,' 'Block User From Editing Credit Card Info,' 'Block User From Viewing Credit Card Info.'
In addition to general Notes (first tab on the bottom of the dialog), there are options for adding associated Charge Types and an Equipment Filter for the PO. Both the charge types and Equipment Filter are optional and only enforced through a custom event or order scripts - see IndySoft for additional details.
Documentation

*Add/Edit Company -*Documentation Tab
The documentation tab can add unlimited documents for the selected company. Each document is saved to the database with optional password protection. So all IndySoft users can view this documentation (if the security profile allows). If the document is password protected, then the password must be input before the document is recalled or edited.

Add Company Document
Tax Tables

*Add/Edit Company -*Tax Tables Tab
Tax tables can be input per company - these tables are used to calculate taxable charges upon invoice. Note : If the shipping address on the work order being invoiced was selected from an Alternate Address, then the tax tables stored along with the Alternate Address (tab 1) will be used instead.

Company Tax Information
The 'Tax District' drop-down is populated from the Add/Edit...System-Wide...Tax Districts list. If the 'Use Defaults' checkbox is used, then the 'Percent Tax' and 'Tax GL #' fields will default from the same fields in the 'Tax Districts' add/edit list.
Extended Attributes

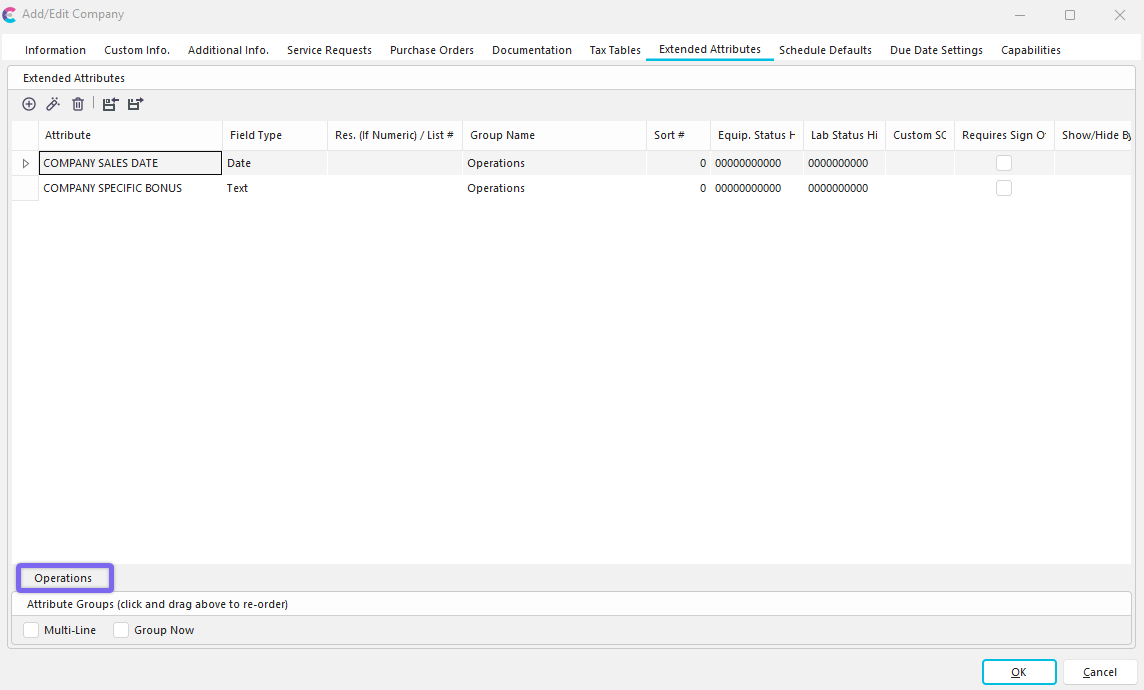
Company Attributes - Extended Attributes
IndySoft supports 3 different ways of adding equipment-level extended attributes. These extended attributes can be viewed/edited from the Equipment View's Attributes tab/dialog:
·Attribute Type - These extended attributes are set up within the Add/Edit...Attributes...Attribute Types wizard. These attributes are only created for assets with an attribute type currently set to the attribute type in the wizard (company + attribute type).
·Company - These extended attributes are set up within the Add/Edit...Companies...Companies wizard. These attributes are only created for the company's assets wizard.
·System-Wide - These extended attributes are set up for all assets in the database across all companies and all attribute types. These attributes are set up within the System Preferences - Extended Attributes dialog/step.
When the Company add/edit dialog is closed, all extended attributes are synced across equipment in the selected company. Any attributes removed from the Preferences dialog are removed from the equipment level, and any new attributes are added. Note: Company-wide attributes will be automatically shown as available fields in all equipment-related filter boxes as soon as a Company field value is selected in a prior filter. The company-level attributes will be displayed in the format of [CompanyName] -- [Attribute Name].
Adding/Editing Company-Wide Attributes
Press the 'Add Attributes' to create a new company-wide attribute. Press the 'Edit Attribute' button to modify the currently selected attribute in the grid. Use 'Delete Attribute' to permanently remove the selected attribute(s).
Attribute Name - the name of the extended attribute
Field Type - there are many different options available. Many options are 'stock' drop-down lists common in IndySoft, populated through other Add/Edit wizards. Use 'Custom SQL' to input your SQL to populate the drop-down list (typically provided by IndySoft Support in consulting). If 'Company Custom List' or 'System-Wide Custom List' is selected, you will see a new 'List #' appear below 'Field Type' - use this field to select the list number that should be used to populate the drop-down.
Res. (If Numeric) - if the Field Type is numeric, then this field will be enabled. Input the resolution (number of decimal places) for the field.
Group Name (Opt.) - if you have many extended attributes fields, you can group them into sub-tabs using this option. All distinct 'Group Name' values will be created as tabs, and related attributes will be placed on this tab. If some extended attributes do not have 'Group Name' values and other extended attributes, do, then the attributes missing 'Group Name' values will appear on a tab named '(None)'. Drag/drop the tabs from Step 3 in the Attribute Types wizard to re-arrange the tabs' left-right order.
Example - Group Name Sub-Tabs for Extended Attributes
If you want sub-tabs to display on multiple lines (if you have more groups that can fit on one line), select 'Multi-Line.' All the extended attributes are shown in the grid in wizard step 3 by default. But if you would like to test the grouping of the sub-tabs, you can turn on 'Group Now' - then you must select the appropriate sub-tab before viewing its attributes in Step 3. When the attributes are shown with the equipment, the sub-tabs will always be used.
Sort# (Opt.) - the order of the attribute relative to other attributes (top to bottom)
Requires Sign Off (User Logged In) - turn on this option if you would like to require that a user re-input their user password each time the equipment attribute is modified. If the attribute is especially sensitive data, this might prevent a random user from walking up to an IndySoft workstation temporarily unattended and changing the data. Only the password for the user currently logged into IndySoft can be used.
Show/Hide By Profile - sometimes, you might want to limit the display/modification of an attribute to a particular profile. Or, you might want to hide an attribute from a particular profile. If desired, select 'Show' or 'Hide,' then select the Profile from the option below.
Profile - see description of 'Show/Hide By Profile' above.
Custom SQL - this is only relevant if the Field Type is set to 'Custom SQL.' Input the custom SQL in this memo box. Typically this SQL is provided by IndySoft through custom consulting.
Hide This Attribute If - use these checkboxes to quickly filter the display of equipment attributes based on the status of specific equipment status fields. There are 10 equipment status fields and 10 lab status fields. These captions will be shown if custom captions are set up for these fields (using Company Preferences or System-Wide Preferences). For each field, 3 states are possible:
| ![]() | Checked - field will only be displayed if this attribute is checked.
| Checked - field will only be displayed if this attribute is checked.
| ![]() | Unchecked - field will only be displayed if this attribute is unchecked.
| Unchecked - field will only be displayed if this attribute is unchecked.![]() | N/A - this field will not be relevant for the display of the attribute. |
| N/A - this field will not be relevant for the display of the attribute. |
 Export Attributes Tab Items
Use this option to quickly export all extended attributes in the current grid to a text file. This file can be used with the 'Import Attributes Tab Items' option to import these attributes into a different database.
 Import Attributes Tab Items
Use this option to quickly import extended attributes that were previously saved to a text file using the 'Export Attributes Tab Items.'
Schedule Defaults

Add/edit Company - Schedule Defaults and Interval Adjustments
IndySoft supports company-wide schedule defaults. These rules can be added and adjusted from within add/edit company; the dialog is as follows:

Add/Edit Schedule Defaults Dialog
Due Date Settings

Add/Edit Company - Due Date Settings
IndySoft supports company-specific due date settings as well. From here, you can set up specific scheduling rules that will apply to any schedules created for gages in this company. You can skip particular days of the week when scheduling, skip certain days/dates annually or adjust (increase/decrease) the calculated due date based on specific criteria. You can also choose the option to use system-wide due date options. For example, if a gage should never be scheduled for calibration on the weekend for a particular company, you can check "Saturday" and "Sunday" as days to skip in this dialog.
Capabilities

Add/Edit Company - Capabilities
More information coming soon
![]() Productivity Tip
Productivity Tip
The Add/Edit Companies dialog box can be filtered and customized differently. See General Interface for more information.
Buttons and Icons are detailed here.